
Table of Contents
ToggleMeta Verified Blue Tick Subscription Plans | Cost of blue tick on Instagram and Facebook
Meta, the company behind Instagram and Facebook, recently said they’re bringing their verified program to users in India. They’re doing something like Twitter – you pay to get a blue checkmark and extra stuff like better security and special support.
Meta Verified pricing plans are $14.99/month per app or $11.99/month for Facebook web only.
In India, you can get Meta Verified for ₹699 a month on iOS and Android apps. This covers both Facebook and Instagram. Soon, they’ll also have a plan for the web that costs ₹599 per month.
How to get verified on Instagram and Facebook
To get Meta Verified in India, you’ll need to show a government ID. Want that blue check on your Facebook and Instagram? Here’s how:
1. Pay ₹699 a month on iOS or Android for both Facebook and Instagram verification.
2. Use your government ID proof.
3. Enjoy the perks of being verified!
Can anyone get verified? Eligibility Criteria
Before you can become Meta Verified and get that blue checkmark, make sure you meet these requirements:
1. Your account has to be yours – not a company or brand.
2. You need to be 18 years or older.
3. You should live in the United States, Canada, United Kingdom, Australia, New Zealand, or India. If you’re not in these places, you can wait for it to be available where you are.
4. You can’t break the rules on Instagram’s or Facebook’s terms or guidelines.
5. Your profile has to use your real full name, and it has to match your ID.
6. Your profile picture should show your face, and it should look like the picture on your ID.
7. You must set up two-factor authentication.
8. You need to have posted stuff before (you can’t just make a new account).
If you meet all this, keep reading and get ready to be verified!
How to get blue tick on Instagram and Facebook: Step-by-step guide
Here’s how to get Meta Verified on Instagram:
Step 1: Open the Instagram app and go to your profile.
Step 2. Tap the Settings icon at the top-right corner.
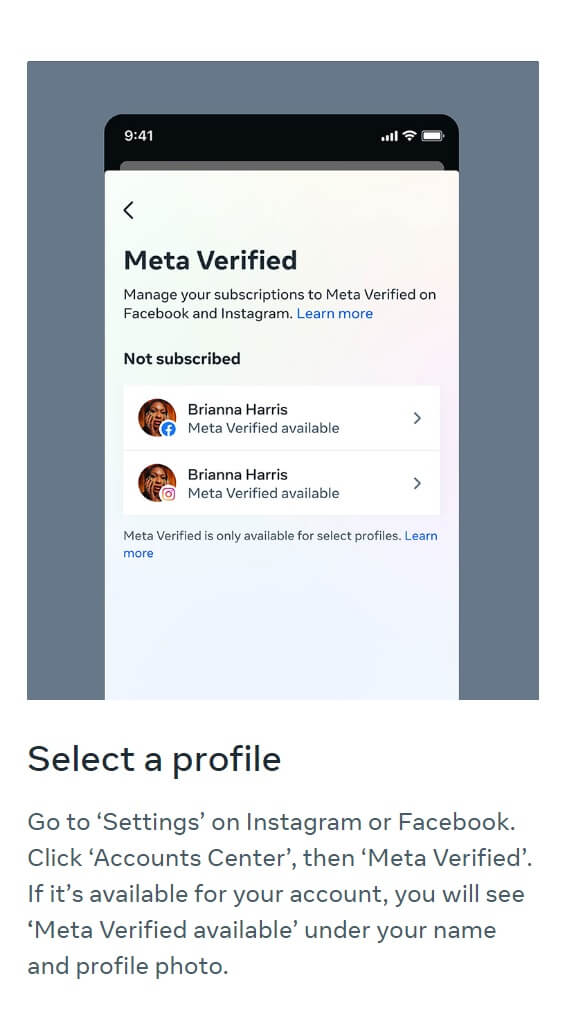
Step 3. Choose Accounts Center.
Step 4. Click on Meta Verified.
Step 5. If it’s available for you, it will say “Meta Verified available” under your name. Then, you can Subscribe.
Step 6. Pick the profile you want verified.
Step 7. Set up how you’ll pay.
Step 8. Prove it’s you by showing a picture ID from the government and a video of yourself. This makes sure you’re the real deal before you can get the subscription.
Once you have subscribed to Meta Verified, you will be able to see the blue tick on your Instagram and Facebook profiles.
How To Buy A Blue Check On Instagram?


Is Meta Verified a good idea for you?
Well, that’s a choice only you can make. If you’re someone who’s pretty important online or if you have lots of people following you on Instagram, the perks you get from the subscription might be really useful. But if you’re not really famous on the internet, you might not need to pay for it. It all depends on whether the benefits are valuable to you, especially if you’re not a well-known public figure with a big group of fans. So, think about what makes sense for your situation before deciding.
how to get verified on instagram,how to get verified on instagram 2023,get verified on instagram,how to get blue tick on instagram,how to get verified on instagram without followers,verification on instagram,instagram blue tick,how to get blue tick on facebook,how to verify facebook account,instagram verification,how to get verified on instagram for free,instagram,instagram verified,how to get verified on facebook,how to apply for instagram verification badge,
instagram verification,instagram verification badge,verification on instagram,instagram verification process,how to get verified on instagram,instagram verified,get verified on instagram,how to apply for instagram verification badge,how to get verified on instagram 2023,instagram,meta verified instagram,instagram blue tick,instagram verified badge,instagram verification request,how to get instagram verification badge,how to get blue tick on instagram
This website is not affiliated with the official app/website. The content provided is for educational purposes only. We do not support or endorse any illegal activities. If you are the owner of the app and have concerns about our promotion, please contact us. We assume no legal or financial responsibility for the application. Users should review the app’s privacy policy and terms of use before using it. We are not liable for any consequences resulting from the use of the app. This disclaimer is for informational purposes only and not legal or financial advice. Users should exercise caution and conduct their own research.